 With the end of the EU project IRPWind, Technical University of Denmark (DTU), Knowledge Centre WMC and Fraunhofer IWES are all in agreement that sub-component trailing edge testing has the potential to become established as an addition to the certification-relevant full-scale blade test.
It allows to draw meaningful conclusions on material characteristics and fatigue. Focusing on critical blade details and simulating any relevant load scenario, the method partly outclasses conventional fatigue testing methods which only consider loads in flap-wise and edge-wise directions.
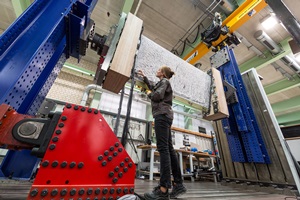
Four cameras follow the course of testing and record the surface of the test object, which has been prepared with a speckle pattern to make deformations with the help of a digital image correlation system visible simultaneously on the pressure and suction sides. In addition, strain gauges and acoustic emission sensors are also used to detect cracks in the adhesive joint. This area of the blade segment is particularly susceptible to damage when subjected to cyclic loading. Fraunhofer IWES developed a load introduction frame for this purpose. The frame is placed on moving adapter plates, which are installed, on ball joints on both specimen sides, enhancing arbitrary combinations of load scenarios to be simulated.
Within the “IRPWind” project, all institutions considered a trailing edge segment measuring three meters in length, taken from the same 34-m-long rotor blade type. While DTU placed emphasis on static testing, Fraunhofer IWES and WMC scrutinized the crack formation at the bond line due to cyclic loading.
IRPWind project has now been completed, but Fraunhofer will continue developing this test methodology further to subject blades to more realistic load scenarios: The construction of a new test bench for sub-components is planned in Bremerhaven which will allow similar tests on a bigger scale.


