Ensuring the Quality of Wind Turbine Parts
 In the fast-growing market for wind power systems, quality assurance according to international industrial standards has become an important issue. Wind power plants are no longer a niche playground for ‘environmental freaks’. It’s a serious business where cost efficiency, life cycle costs, reliability and availability of the components must be considered. Coordinate measuring machines play a vital role in ensuring the accuracy and quality of components. This article describes how Carl Zeiss Industrielle Messtechnik has developed its series of MMZ machine measuring centres, which are tailored for the precise, economical measuring of large parts directly in the production environment, and in particular looks at the MMZ G, which has found application in quality assurance for gearboxes and other parts for large wind turbines.
By Hannes Daniel and Jürgen Dussling, Carl Zeiss Industrielle Messtechnik, Germany .
The industry has to meet these requirements, despite the fact that not many manufacturers have been able to produce such large gearboxes, and, with the prospect that with the new offshore systems being created, the size of the units will have to increase still further. All this means that manufacturers have been faced with the problem of going into large-scale production not knowing the quality requirements for such large pieces of machinery!
Gears (ring-gear, sun gear and planets), bearings and housings have to be produced with tolerances of as little as 0.01mm – on components that can be more than 4m in diameter!
It is no longer possible to machine these parts without specific measures to ensure the quality: the parts are too expensive to produce rejects. So a reliable control of the manufacturing process has to be installed, in real-time, within the production environment.
Carl Zeiss has been a manufacturer of the most precise measuring instruments for 90 years. Since 1973 the company has become one of the market leaders in 3D coordinate metrology.
Because the traditional customer for the coordinate measuring machines (CMM) was the automotive industry, the standard machine size was around 1m³. But from a very early stage in the company’s development, applications in other industries, such as printing machines, truck diesels, energy and aircraft parts, have made it necessary to develop a series of larger machines.
Today’s models are the MMZ Series. MMZ E and MMZ B are gantry-type machines, especially designed for composite parts and machined parts with standard accuracies, while MMZ T is a bridge-type machine with an integrated steel-table for high accuracy when machining in the ‘mid-size’ class (up to 2000 x 3000 x 1600mm). Finally, there is the MMZ G for really large, precision-engineered components. Sizes are available from X=2000mm, Y=3000mm and Z=2000mm up to ‘giants’, allowing gears and bearings up to 5m in diameter, and housings or other machined parts up to 11m in length, 5m in width and 3.5m in height, to be accurately measured.
The machine has a welded steel construction, entirely calculated according to the finite elements method. The machine moves on linear guide tracks, driven by a ball screw spindle; and it is a rigid and robust machine tool.
The MMZ G can be equipped with floor integrated rotary tables, holding up to 12,000kg. Gears can be measured with or without a rotary table; however, for some helical or bevel gears, a rotary table might be necessary to get full access to gear flanks.
With the CALYPSO standard software, all geometric dimensions can be easily measured, including form and position tolerances. The additional GEAR PRO software makes it possible to measure internal and external gears, straight or helical. Bevel gears and worms are also measurable.
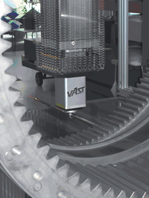
With the ZEISS VAST probe head, the machine is not only able to measure single points but is also ideal for surface scanning. Navigator technology allows scanning using long, flexible styli at high speed and without losing accuracy.
The probe head can hold stylus systems up to 600g in weight and 800mm in length at all angles. This allows the probes to penetrate deep into housings, making difficult structures accessible. The MASS technology (Multi Application Sensor System) from Carl Zeiss allows the easy use of the articulating probe holder, RDS, which can be equipped with different optical or tactile sensors.
The typical accuracy varies from 2.8µm + L/400 for the 2m x 2m to 8.4µm + L/180 for the 5m x 3.5m bridge.
The MMZ G is not just a gear checker; it can also be used to measure housings, bearings and all kinds of different precision parts on the same machine with an accuracy that is the best in class. MMZs are in use in the wind energy industry all over the world including North America, South Korea, China, India and several European countries.{/access}
 In the fast-growing market for wind power systems, quality assurance according to international industrial standards has become an important issue. Wind power plants are no longer a niche playground for ‘environmental freaks’. It’s a serious business where cost efficiency, life cycle costs, reliability and availability of the components must be considered. Coordinate measuring machines play a vital role in ensuring the accuracy and quality of components. This article describes how Carl Zeiss Industrielle Messtechnik has developed its series of MMZ machine measuring centres, which are tailored for the precise, economical measuring of large parts directly in the production environment, and in particular looks at the MMZ G, which has found application in quality assurance for gearboxes and other parts for large wind turbines.
 By Hannes Daniel and Jürgen Dussling, Carl Zeiss Industrielle Messtechnik, Germany .
{access view=!registered}Only logged in users can view the full text of the article.{/access}{access view=registered}
Gearboxes are a major part of all wind turbines. The quality requirements are high. As the wind blows in gusts, a backlash free operation is indispensable to ensure a long and beneficial life for the system. Economic efficiency is directly related to mechanical efficiency. There is a further requirement for noise reduction in the gearbox, a feature that is important to ensure the public acceptance of wind turbines.The industry has to meet these requirements, despite the fact that not many manufacturers have been able to produce such large gearboxes, and, with the prospect that with the new offshore systems being created, the size of the units will have to increase still further. All this means that manufacturers have been faced with the problem of going into large-scale production not knowing the quality requirements for such large pieces of machinery!
Gears (ring-gear, sun gear and planets), bearings and housings have to be produced with tolerances of as little as 0.01mm – on components that can be more than 4m in diameter!
It is no longer possible to machine these parts without specific measures to ensure the quality: the parts are too expensive to produce rejects. So a reliable control of the manufacturing process has to be installed, in real-time, within the production environment.
Carl Zeiss has been a manufacturer of the most precise measuring instruments for 90 years. Since 1973 the company has become one of the market leaders in 3D coordinate metrology.
Because the traditional customer for the coordinate measuring machines (CMM) was the automotive industry, the standard machine size was around 1m³. But from a very early stage in the company’s development, applications in other industries, such as printing machines, truck diesels, energy and aircraft parts, have made it necessary to develop a series of larger machines.
Today’s models are the MMZ Series. MMZ E and MMZ B are gantry-type machines, especially designed for composite parts and machined parts with standard accuracies, while MMZ T is a bridge-type machine with an integrated steel-table for high accuracy when machining in the ‘mid-size’ class (up to 2000 x 3000 x 1600mm). Finally, there is the MMZ G for really large, precision-engineered components. Sizes are available from X=2000mm, Y=3000mm and Z=2000mm up to ‘giants’, allowing gears and bearings up to 5m in diameter, and housings or other machined parts up to 11m in length, 5m in width and 3.5m in height, to be accurately measured.
The machine has a welded steel construction, entirely calculated according to the finite elements method. The machine moves on linear guide tracks, driven by a ball screw spindle; and it is a rigid and robust machine tool.
The MMZ G can be equipped with floor integrated rotary tables, holding up to 12,000kg. Gears can be measured with or without a rotary table; however, for some helical or bevel gears, a rotary table might be necessary to get full access to gear flanks.
With the CALYPSO standard software, all geometric dimensions can be easily measured, including form and position tolerances. The additional GEAR PRO software makes it possible to measure internal and external gears, straight or helical. Bevel gears and worms are also measurable.
With the ZEISS VAST probe head, the machine is not only able to measure single points but is also ideal for surface scanning. Navigator technology allows scanning using long, flexible styli at high speed and without losing accuracy.
The probe head can hold stylus systems up to 600g in weight and 800mm in length at all angles. This allows the probes to penetrate deep into housings, making difficult structures accessible. The MASS technology (Multi Application Sensor System) from Carl Zeiss allows the easy use of the articulating probe holder, RDS, which can be equipped with different optical or tactile sensors.
The typical accuracy varies from 2.8µm + L/400 for the 2m x 2m to 8.4µm + L/180 for the 5m x 3.5m bridge.
The MMZ G is not just a gear checker; it can also be used to measure housings, bearings and all kinds of different precision parts on the same machine with an accuracy that is the best in class. MMZs are in use in the wind energy industry all over the world including North America, South Korea, China, India and several European countries.{/access}


